| AFX install page | |
Underdrive Pulley install for a 2gnt.
Some aspects will be different depending on the accessories that came
with your car. If you dont have air conditioning, buy a new belt
before you begin because the 2 belts that come with the set are for the
1 alternator and 2 the power steering and air conditioning. Also,
if you have cruise control, you will have to remove the cruise control
box. You will also have to remove the coolant reservoir. The
steps are listed below.
No matter how you do it, it will be some hassle. The old pulley is on there extremely tight! You will need the puller!!!! You can try oven heating the new pulley to slide it on, but sometimes it works and sometimes it dont. Plus you have to have good mittens to handle the heat! This way will take about 3 hours start to finish if you have all the right tools and youre good to go! (it took me a lot longer than 3 hours, just be patient and it will work out).
belt #'s
|
p/s, a/c belt Bando- 5pk1270 gates- k050500 dayco- 5050500 goodyear- 4050500 day/pl- 500k5 Alternator belt bando- 3pk800 gates- k040315 dayco- 5040315 goodyear- 4040315 dayco/pl- 315k4 |
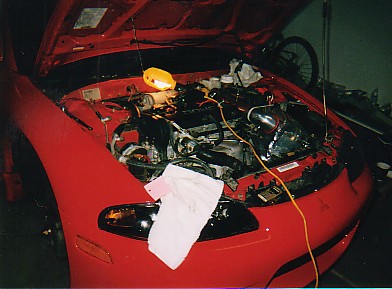 enginebay
during install enginebay
during install |
1. Raise and block car (use at least 2-ton jack stand(s) because you will need to use the jack later).
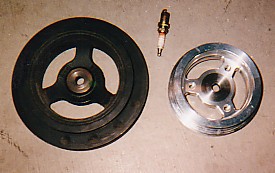
2. Take off passenger wheel; unbolt plastic cover that you look at with wheel off. There are several bolts that need to be taken out. The plastic cover should come right out (give it a little wiggle if it does not fall). BAM, theres the ugly/heavy/big stock pulley! While looking at the pulley, youll notice the alternator on the left, and the power steering/ac assemblies on the right.
2. Take a good look at how both belts go onto the pulleys! Loosen alternator, and the p/s a/c tensioner pulley. Take off belts (I just cut them off). Refer to the tightening of the belts further on in the steps for loosening of the belts. (Step 10).
3. Jack engine up under oil pan (make sure you put a piece of wood on the jack when jacking on the engine. If you jack directly on the oil pan it can bend up) Put the wood so it lifts on the edges of the oil pan. just slight pressure at this point.
4. Take off passenger side motor mount. To do this, (pop hood if you havent already) on the pass side of the engine between the coolant reservoir and the strut tower there is a metal bracket that sits next to the engine. There are two nuts and one bolt on the right upper side of the bracket (17mm). There is also one more that goes through the center of the bracket. To get to it, remove hoses that feed into coolant reservoir (watch out because some might spill on you, just use the theory of gravity to get it into the reservoir). Move the piping and cap off to the side (I placed on top of upper radiator hose). To remove the coolant reservoir, wiggle it a little, and pull straight up on it. Place that in a safe place to the side. You will now see the bolt that goes through the motor mount. Remove the bolt. Now apply more or less pressure to the engine to remove the mount by using the jack. Once the motor mount is out, check out the crappy stock rubber motor mounts.
5. Lower motor about 1-2in. (enough that the closer section of the pulley clears the frame. The larger portion of the pulley will be able to be pulled also, dont worry). If the motor ill not go down far enough for the smaller portion of the pulley to clear the frame, you will have to loosen the front donut motor mount. This motor mount is in the center front section of the car between the radiator and the engine. It looks like a donut that sits the same way the tires do. You should only have to loosen this bolt. If you still do not have enough clearance, put the mounts back on, tighten the bolts, and jack the engine up closer to the drivers side of the car (you can use the transmission, but be careful) and repeat the process.
6. (read this whole step before starting) Remove stock pulley bolt, it is a 19mm bolt, and you will definitely need a breaker bar or impact wrench. (at this point go buy same thread bolt but 1-2in. longer and 5 or so thick washers that fit bolt(you want enough washers minus one to make up for the difference in size of the bolts), washers to be used later) screw in 1in. of longer bolt into crank. The new bolt should be 7/16 and longer. (Home depot did not carry the bolt needed, but Lowes did) you will need this bolt to get the last few pulls on the pulley so that it comes off. You also want an enough amount of threads inside the crankcase that the force on it, removing a pulley, does not strip out the threads. It is on there really tight, hence the next step.
7. Rent or buy a 3 jaw 5 ton gear puller. from local auto store and pull off pulley. This should cost around ~$50. I was able to rent one from AutoZone for $40. Put the jaws around the inside part of stock pulley to pull it off.
8. After you have the stock pulley off, you have to put the new one on. There are 2 methods to do this. 1 You can also heat up the pulley with a torch, just be careful. 2 This can be done by heating the pulley up in an oven (to expand it). To do this, set oven to 500 degrees F, place pulley in there, and when the oven reaches that temperature, take it out (use good gloves, I had two thick shop towels but I was careful). The pulley should slide on. Mine only went on about a millimeter, but good enough for me. Now you can thread the longer bolt with washers between head of bolt and pulley.
9. Use ratchet socket and bolt to "pull" new pulley on. Use the washers you bought to even out or distribute the force onto the pulley evenly (to prevent wobbling of pulley) Remove or add washers as needed to "pull" pulley on tighter. At some point you can put stock bolt back in to finish "pulling" on the rest of the way. This becomes difficult because the pulley moves with the turning of the bolt at a point in time. I stuffed a long extension (u can use a screwdriver, whatever helps) between one of the inside spokes on the pulley and the engine. There was a plastic cover there too. You wont be able to get it on there all the way, but for now its good, (I stopped when I could barely stick my whole pointer finger nail between the engine block and the pulley)(you can also reference where the alternator and p/s a/c pulleys to see if it lines up properly). Now the belts
10. Add new belts tighten all acc. (all of this is done on the passenger
side of car)
For reference, the general rule of thumb for belts is to press down
on the belt on the longest stretch between pulleys, and it should deflect
no more than about 1/2". Use this to gauge if your belts are tight
enough.
Start by putting the smaller belt on first. It will go on the
larger part of the pulley, and hook around the alternator (to the left/firewall).
Put it straight on the new pulley, and only get a little bit on the alt
(unless it slips right on) and then turn the alt pulley while pushing it
onto the pulley. You will have to figure out which way it spins freely,
I forgot. To tighten the alternator pulley, you have to loosen 3
bolts. There is a bolt on the bottom of the alternator that is on
the driver side of the alternator. This bolt is below and to the
left of the triangle shaped bolt pattern (that is used for mounting the
alternator) loosen this bolt (mine had a funny bracket on the nut side
of the bolt), but do not take completely out (a few turns should be good).
Then stand back up, and look between the strut tower and your firewall.
If you have cruise control, you have to remove the black box that is
there. There are several small bolts that hold it together (dont
forget the one on the bottom) there is also a sensor (mine had blue tape
on it) bolted on to it with a larger bolt. Make sure to remember
to use that same bolt when u put it back together, also you should keep
track of the spot you set the sensor at. You will take off two pieces
off the box assembly by removing bolts that hole pieces together, and several
to hold it onto the firewall (set the bolts and two pieces aside).
The last piece will remain connected the engine bay by wires. The
one in the engine bay will have to be placed out of the way. To do
this, there is a steel braided line that is bolted to the firewall, I removed
that bolt and the assembly was able to get out of the way nicely.
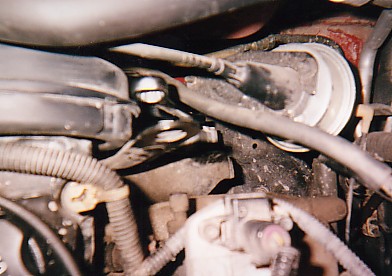
New Picture of Alternator Locking bolt, and a wrench sitting on it.
It is very hard to see, but might help you if you can't find it.
If you dont have cruise control, I hope you skipped that. I did (99gs),
so this also may be different than your setup. Now you can barely
see the top of the alternator (use a shop light and hang it off the hood
there are a few nice spots). There is one bolt that is easy to see
(on the top/left if you are looking at it and when u look up, you see hood)
that bolt is the alternator lock bolt. Loosen this bolt to allow
the assembly to be tightened/loosened. (I got it from the top very slowly
with a hex wrench) Now, if we use that bolt for reference, closer to the
firewall, and pointing somewhat downwards slightly, there is a 13 mm bolt.
(I got to it by reaching over the intake manifold, put hand down (be careful
not to mess up any connections or sensors) and bending my arm back towards
the alternator with my right arm). You can feel the bolt with your
left hand if you reach straight down. I used my right arm and a 13
mm hex wrench. Pull up on the wrench to tighten it, and push down
to loosen it. **(There is a good example in Chiltons on pages 1-34
and 1-36 for good pictures of the alternator and bolts)**. Now you
have to tighten back up the lock bolt on the topside of the alternator
(the one used for reference). Then get back on the floor and tighten
the bolt at the bottom that you loosened first.
Now that you have the alternator belt tightened, now the A/C P/S belt.
This one was easy, and you get to stand up. I dropped the larger
of the two belts from the top and got it to sit correctly on the belts
(get back down and check to see if you can get it on the new pulley).
This belt goes on the smaller part of the new pulley. To tighten
it up or loosen it, refer to the small pulley that the belt wraps around
in-between the other pulleys. It is wider, and is shiny/lustrous.
You will need to loosen two bolts on this pulley. First, loosen the
bolt that runs in the middle of the pulley, that is the lock bolt.
Then, the bolt that is on the side of the pulley, loosen of tighten that
loosen or tighten the belt. Once the belt is tight, tighten up the
lock bolt and you are good to go.
Make sure both belts are tight with little deflection or they will
squeal. This process of tightening the belts will have to be done
after a few weeks because the belts will sit properly on the pulleys over
time, and they will stretch by a small amount also.
11. Now put back the cruise control box, make sure you check all the sensors that you have touched to make sure they are good to go, and then put the tire on. Dont put the splashguard back on until you have torqued the pulley. If you have done so already, then put everything back together.
12. To tighten your pulley more (it needs to be torqued to 105 ft.lbs, put your car back on the ground in gear (I put her in 5th), hand brake on and wheel blocks I used a long socket extension (or several short ones connected together), stuck it through the front right wheel all the way to the crank bolt and tighten it with the torque wrench. (I have heard stepping on the brakes inside the car also helps)
13. Once the pulley is torqued down, you can remove the wheel and bolt
the splashguard back on. Then put the wheel pack on and you are good
to go.
Listen carefully for squeaks because they can make you look like a
fool. I have only a slight noise when I turn my wheels all the way
to either side, but no noise otherwise.